Thursday, January 28, 2016

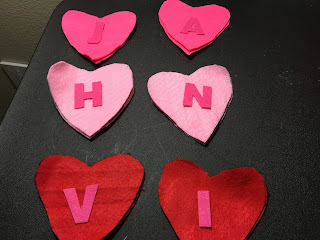
Name Heart Garland

Valentines day is coming up soon and whereever we go we find so many hearts .. heart balloons, heart plates, heart candies, heart chocolates, heart photo frames.. the list is just endless :)
However, since we are not the romantic type theres nothing much for us to buy.. but that didn't stop me from making something nice and cute for my daughter - A heart name garland :)

I had a small piece of cotton batting leftover from making a couple of quilts (for my daughter, husband and aunt) that I didn't feel like parting with but it was also too less to be used for anything. So the felt garland seemed to be the perfect thing to make with the batting.

I bought some felt sheets from Daiso, hand drew hearts onto them (could be very uneven so its better to use some template) and cut two pieces for each letter of the name.


There were a few felt letters from a previous project so I stuck them onto the hearts with some fabric glue.


Unfortunately the letters were also pink so it didnt turn out very visible in the first two hearts.

I then learnt how to seal two felt sheets together with a butterfly stitch from pinterest. There's a great step-by-step tutorial here : Butterfly stitch
So I stuffed the hearts with cotton, sewed the two heart pieces together and made a garland with all the completed hearts. 


I used some glittered fabric paint to give some lining to the letters so that they standout. 


Tuesday, January 19, 2016

Painted glass lamp

So its not just about sewing.. is what I realised. I also like random painting and by that I mean painting my style (no techniques involved)

My mother-in-law buys a lot of honey from her friends in Madikeri (Coorg district) for my daughter. Coorg is very famous for its natural forest grown spices like cardamom, cinnamon, pepper, coffee etc. Honey is also one of their specialities and when bought in bulk it always came in wine bottles.

Being someone who doesn't want to throw away much I decided to recycle these bottles in a creative way (sadly theres nothing that can be stored in those bottles)

While I was watching some DIY videos on YouTube, I saw a beautiful tutorial on how to upcycle wine bottles into lamps and thats exactly what I did with two of the honey bottles :)

We had to run around to drill a hole into the bottle where the cord was to be inserted. It seemed so easy on the tutorial video but no one in Mysore was willing to drill as they said the bottle will crack.
But my mother-in-law (who is a big supporter of my craft work and without whom it would have been close to impossible to make the lamps) had persistently requested a guy who was half-willing and got it done for me. A BIG THANKS to her!


I bought some gold paint and painted the bottles, decorated it with few red plastic flowers and added some coloured fish-tank stones to make it look good. 


BTW, the lamp shade is from MOTHER EARTH.. I did not paint it :D

Monday, January 11, 2016

A simple cushion cover

There was a post on Facebook sometime back from someone who wanted customised cushions.
And since I had recently purchased 2 beautiful holiday cushions (which I got at a great price in Sears) I wanted to see if I could actually make one for myself :)
I wanted to add some applique on the front side but the fabric I used is so bright and colourful that I decided otherwise.

Again.. there are zillion videos on how to (sew) sandwich cushion covers all over youtube and pinterest but I tried a little patchwork for mine because I thought it would look more attractive this way. I have included brief pictures on what I really did but the technique is extremely simple and involves just basic common sense.

For a sandwich cushion cover all that has to be remembered is that for the back piece you need to cut your fabric into pieces and since you want the 2 pieces to overlap, you have to cut about 3 - 4 inches bigger than half.

And since I was patching up 2 fabrics this is how I cut mine:


When the 2 pieces are sewn together I ended up with this:


My cushions are 18" X 18" so my back pieces were about 11" X 11". After that I sewed both my front and back pieces (already patched) together and flipped it inside out.


I also made a patchwork cushion cover which measures 16" X 16". 


Friday, January 8, 2016

Travel Cord Organiser

We were frequently travelling when we lived in India - mostly either to Chennai or to Mysore or once a year to some other place for a break.

I love to travel light and so I never really carried anything more than my handbag and small suitcase/bag for my clothes. My husband, on the other hand, loved to take his entire wardrobe along if he could. His luggage almost always included his gadgets - mainly his laptop, tablet(s), phones, earphones etc. and these obviously came with their own sets of chargers and wires.

That is when I realised how great it would be to make a carry-on organiser for the cords!

I was looking for something where I could store these cords and also easily carry it around in our backpack or handbag (and mainly to save them from getting tangled with one another).

Thats when I came across this great tutorial on Pinterest -  http://www.liveitloveitmakeit.com/2014/09/makers-month-make-it-cable-cozy.html
Although the main idea was from there I did not completely replicate it and did my own version of the cords organiser. I didn't find great use of the zippered pouch that was on the tutorial as I didn't want the pouch to become too bulky after stuffing things into it; and to hold my phone charger I gave a bigger gap to one of my elastic partitions.

I used these:
Felt sheet - approx 12 inch X 10 inch
Scrap cloth (reused one of my daughter's shirts that was too tight for her to wear)
Elastic tape
Velcro
Fancy button (just to give it a pretty look)
Felt alphabets (again.. to give it a nice pretty look :))

And this is what I ended up with :


Thursday, January 7, 2016

Mrs & Mr Pillow

Further to my earlier post on applique, I've been seeing so many of the "couple" bedspreads and pillow cases that look so cute and make a perfect gift.

There are so many designs out there that I was confused on which one to pick. Since my husband is not big on moustaches and beards, I decided to go with the shirt tie and lips to match it. Coincidentally my bedspread and comforter is white with black flowers (which is not seen in the pic) so that made it so much easier to choose my applique scrap cloth. 


In the picture the lips looks a little deformed as the red scrap cloth I had had printed white lines all over it (leftovers from the wallet) trust me it looks much better and like 'real' lips if you saw it on my bed.

Tuesday, January 5, 2016

Customised/Appliqued Towels

Who doesnt like personalised gifts? They seem to have become the latest gifting trend!

So.. I've been wanting to get a couple of towels customised for my daughter for the past year. A couple of friends recommended a few names who specialise in these but professionals (as usual) charge a BOMB for a small towel that wont even go around my little toddler's waist. But that I realised only after ordering and receiving the towels.
However, I should definitely say that they were really cute and my daughter was ecstatic to see beautiful princess and mermaids on them :)

And now since I don't have the option to get these delivered to me, I was thinking about trying my hand at it. Pinterest (btw .. am becoming a pinterest addict) has a zillion tutorials on how to customise towels, cushions, pillows, napkins etc.

Here are a few simple ones I tried:

Towels for my daughter and me


I used: 

2 Plain white towel 
Heat and Bond sewable adhesive (the purple colour print one) 
Various scrap fabric
Names printed on plain white paper which I then reverse traced onto the heat and bond PAPER SIDE

I recently made another one for my niece (have been wanting to make one for her since my daughter was born).. She particularly wanted a swan on the towel so I found this really cute one on Pinterest which I replicated :)

This is how mine turned out:


It didn't look very nice when I sewed around it as I am not good with sewing curves.. so I decided to hand-stitch (blanket stitch) the flowers and water applique. The others were too cumbersome so I decided to machine-stitch them (far from perfect.. :( )


A homemade wallet

Sewing has become one of my recently acquired passions - and by sewing I don't really mean clothes but other items which I see on other pages and blogs and feel that these are good to be tried at home :) This has started to give me so much pleasure and though am not a professional at it (and the end product is far from perfect) I still feel good about the progress I make each time.

So... from the time I moved out of India I've been trying my hand at a few sewing and personalisation projects because for one thing the materials are so easily available here and for another the options you have is unbelievable!!

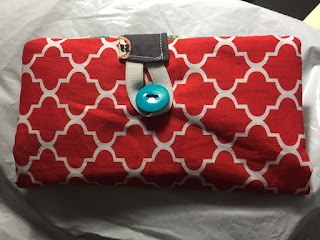
One such project was the Organizer wallet which I tumbled upon while browsing for a credit card holder on Pinterest.  The detailed tutorial can be found at https://elily00.wordpress.com/tutorials/wallet/  

The tutorial is perfectly detailed and easy (thanks to the pictures, which made my life really easy). However, I did use my own 'easy' steps while I did the credit card holder part (as I ran out of cloth pieces). The wallet turned out really colourful and much better than I imagined I could create. 

If you're thinking of trying it out, please check out the instructions on the link above and do share with me your creations!

Happy Sewing!

The outer layer and the lining clothes are Fat Squares from Walmart, the fusible fleece and button were from Joann's and the zipper pouch and the credit card pockets are from fabric scraps which I bought in India.