Friday, July 19, 2019

Kids Art Bag

Usually for Navratri (an Indian festival for celebrating womanhood over 9 days) I try to hand make return gifts for the girl children who visit our home. In South India, we keep mud dolls during those days to represent various mythological events that happened in the past; to represent the beliefs of most Hindus in the world.


Since I started to sew, last year was the first time I thought of making useful handmade gifts for the festive season.

My daughter recently started going to art classes and what she needed the most was a storage bag for her books and art accessories. Therefore for Navratri 2018, I decided to make travel art pouches/bags for kids to take with them while travelling. This way, the kid's are busy and parents can get some breathing time :)

I had to make 10 of these, but it took less time than was expected - around 20 mins per bag. But since I could work on only 1 per day, it took me around 10 - 12 days to complete the pouches and another 2 / 3 days to work on the personalisation.

And the end result:

tadaaaa


No pattern was followed, this was just my own creation and measurement to fit an art book and colour pens.


Tuesday, January 29, 2019

A Scrappy Quilt

We're all set for spring! or atleast that's what these fabric scraps made me think :)

A while ago, I received a bunch of fabric from our neighbour. In there, among lots of beautiful ones, were so many neatly cut scrap fabric that were maybe meant for a project she was working on.

Recently when I re-organised the"sewing spot" in the room I share with my daughter, I again noticed these scraps. They have been lying around for such a long time and I never came up with any pattern that was appealing to the eye. I had given up and thought of using ALL of those as bias tapes.

One day, while watching videos on Youtube, I came across this amazingly easy and quick scrap quilt top which only took 40 minutes to sew. It was sooper easy to make and much faster than I imagined.

I laid out the scraps according to how I liked and pieced them up all at once (as per the tutorial video) About 43 pieces sewn together so my quilt top is bigger than the one on the video. This is the longest I've ever sewn !
It took me around 3 hours from the beginning to the end to complete the quilt.


There was a plain green IKEA throw that was lying on our couch for a while. I didn't want to make this without batting & backing as it wouldn't be warm enough, so I used the throw as a backing for this pieced up quilt top. 
Like mentioned on the tutorial, the entire top was very simple and quick to sew. I just love how it turned out :) 


It seems a bit bulky to be used as a throw and maybe better if used as a blanket on the bed. But for now I think I'll just leave it on the couch for my daughter to use on movie nights :)


Thursday, April 26, 2018

Sewing machine pedal anti-slip mat

This by far is one of my best and most useful works :)

Since I started sewing/learning to sew one of the fundamental problems was my constantly moving sewing pedal - both in hardwood/tiled floors and carpeted floors. It always took a couple seconds for me to locate the pedal after fixing a broken thread or changing the stitch/fabric.

How many times have I had to hunt for my sewing machine pedal while in between a project!?!
So when I saw this tutorial I was THRILLED! Finally respite from the pedal-hunt!

Pinterest offers a wide range of ideas for a variety of daily life problems. A big shout-out to the women & men who post their amazing ideas for free; how extremely generous of them to share it along with detailed pictorial instructions and tutorial videos. :)

I honestly feel this project is a must have for all the women who sew - a sewing machine pedal anti-slip mat. This is the tutorial I followed - https://so-sew-easy.com/non-slip-sewing-machine-foot-pedal-pad/#_a5y_p=3758438

This is how mine turned out -


I used - shelf lining mats from walmart cut to slightly bigger size than my pedal, upcycled bias tape fabric and the cushion stuffing from the cotton batting that was wasted from my sewing machine organizer tutorial.

Wednesday, January 10, 2018

A few random ones

1) Cushion covers that were made for a friend's house-warming party

     
When a friend invited us for her house-warming party, I decided to hand make something she        could use for her house. The only thing that came to mind was cushion covers. Since I had gained  quite some practice making simple ones, I tried to add a ruffle pattern to make it look like a designer piece.

Not to brag, but the next day she messaged me saying these were adorable and looked like boutique designer pieces :) :)


2) Navrathri goodie bags 


My in-laws receive a lot of silk shawls from the temple in Mysore. One day when we were visiting old family friends, the aunty had made a cute little pouch with the shawls she had received from the temple. Thats when I thought what a great idea it was to upcycle these shawls into goodie bags .. especially when Navratri was just around the corner. And thats exactly what I did for the adult goodie bags. Since I couldn't find anything to upcycle for the kid's bag, I bought the main & lining fabrics and zips from Bangalore


3) Sunglasses Cover


We were going on a short trip to India this September - and there was my opportunity to try out something to gift my relatives - most particularly my aunts and cousin. Since its usually very hot in India everyone has sunglasses. I saw this amazingly simple tutorial on Youtube.com for under 10 minutes sunglasses cover , and believe me it was exactly under 10 minutes :) So I made a couple to take with me to India. 
Couldn't really upcycle anything in this. The lining fabric was this very soft silky one perfect to use a sunglasses wiping cloth as well :)


Yet another upcycled tote

And this time it's a tote for myself :) 

I have recently started thinking of becoming better at what I make. After a break of more than a few months - well not really a break but knitting a sweater is taking most of my free time and it's not nearing completion at all. 

Anyhow, for some reason I didnt know what to do with all the totes, purses and pouches etc. I made so far and neither have I figured out how to market/sell my work as am not there yet :)
However, the good thing is, sometime last week I ended up donating all my previous handbags and Ipad bags to the homeless. It was very satisfying to know that someone really in need will be using my work :)

So that left me with no bags at all.. hahaha... and that's why this one was made. One of my neighbours gave a me a couple of scrap fabrics while moving out of the apartment. 
This pink fabric that I used for the front of the bag was my favourite of the lot!
It's amazingly colourful, sturdy and stiff cotton fabric that was perfect for the bag. an old bedspread for the inside of the bag.


Rice bags are very stiff and firm and make a great stabiliser option. And unlike other parts of the country, the Indian stores here do not recycle these bags, so it's also one of the best ways to upcycle :)

I somehow always end up adding a pocket inside my bags to keep mobile phones. This time I also included a small partition to put in a pen, and a loop to include sanitisers or keys. There is another zippered pocket at the back of the bag :)


The backside of the bag has a different top fabric than the front side (didn't take a picture of it). I didn't use any particular pattern, but just used my own expertise from the previous ones. The finished bag measures about 13"X16".

Tuesday, June 27, 2017

Upcycled Zippered Tote Bag

It's been long pending - a tote bag for my MIL...

She has been asking me to make a bag for her with an inside zippered pocket for quite sometime now. But as usual life happens and time flies, it was really difficult for me to spend time on sewing the bag.

One day, while clearing up our closet I found my husband's old kurta that he had asked me to give away. Since the kurta looked brand new I did not feel like parting with it. That is when it struck me to make the bag out of it. So I used one of my MIL's old sarees and the kurta as lining along with the usual rice bag for stabilising (and the inside zipper).

I found this amazing tutorial on the internet that I followed to make the tote bag, along with using my own ideas for making the inside zippered pocket and bag straps. Bag with Zip


Baby Memory Quilt

In continuation to my "Pouches post", I had an order for baby memory quilt by the same girl who had asked for the pouches.

She gave me all her little boy's onesies that he had outgrown to convert into a quilt. 

It wasn't very easy to work on it because of my very tight work-home-child schedule. We were also travelling to our country and upon our return she was going on vacation in 3 days. So I had to hurry up to finish it although we were all severely jet-lagged and exhausted.

The onesies prints were mostly of the same size, so cutting them was pretty quick and consistent. But then there were also a couple that had larger prints, so the quilt top needed lot of adjustment from pieces here and there to make it look uniform. 


I wish I had more time to plan and work on it, maybe that way I could have done a better job.. but oh well! I only hope her family liked it :(


Monday, May 22, 2017

Pouches

Facebook is the new e-commerce hub, apparently!
Anyhow, I have always wanted to take my work one step ahead by making it for others besides family/friends (maybe even for a small charge) but I was never confident about it.

Then suddenly one day, I saw this post on a local Facebook page asking for baby memory quilts. There I thought was my best opportunity! I reached out to that person and shared my blog with her. She was quite impressed (I know right!) and made me 2 offers - one for the memory quilt and another for pouches to gift her relatives and friends back home.

Could I be more excited?!! :)

So there I began working on my very first order. The good thing was that she had given me all the materials - batting, clothes, buttons and zippers. She asked me to make sunglasses pouches, cosmetic pouches and flap pouches - five of each.


The pouches were adjusted to fit the zipper size so they don't all look uniform.


PS: No particular pattern was followed, I made them purely based on prior knowledge :)

Saturday, April 8, 2017

Its Knitting time!

On a snowy cold weather when the whole city is quiet,  most people want to curl up under their blankets beside their loved ones and listen to the silent snowfall. But then there are some others, like me, who want to knit :) - just perfect for the weather!!

I saw many posts on facebook about how people love to knit sweater, hats, socks, booties etc. during the winter season and realised how cool it would be if I could make some for my family. 

The thing I really like about the local community is that they are extremely generous with their time and are always ready to help. That's how I found this amazing knitting group who volunteered to help new knitters learn. 
Thus with the guidance of a wonderful lady - Gerri, I started on my first ever knitting project - A hat for my daughter (followed by one for myself).


The hat was such a hit among my friends & relatives that I was bombarded with requests for hats with earflaps. So with the help of multiple patterns from ravelry.com and youtube tutorials, I made 4 hats with earflaps (2 of each).


Then one day, I suddenly realised I needed a break from hats and started widening my knitting skills to try some booties & socks (again made 2 of each but since they were all gifted I forgot to take pictures before giving them away) 


There are many great patterns all over the internet for hats and socks. But here are a few I followed : 

http://onehookandtwoneedles.blogspot.com/2016/03/0-3-month-booties-beginners-knitted.html
https://www.youtube.com/watch?v=rqbY6IIXTgA
https://www.youtube.com/watch?v=Z72LfwSDWlM&t=1106s

Like always, I added my own ideas and tweaked the patterns here and there to make it more colourful/different (and to learn different stiches :))

Currently, Gerri is helping with my ongoing project - a sweater for myself - and since its a HUGE one, I will update the blog with pictures and patterns once it's finished (I can't wait!!) - which will be a few months at the least!


Sunday, December 25, 2016

Ipad / messenger bag

Its the end of 2016!

Besides sewing, I've also started to learn to knit (the perfect thing to do in this season). Not only is knitting interesting,  but its also extremely relaxing :) Theres this local facebook group for knitters where many members were willing to teach those who were interested to learn. Thats how I met Gerri who taught me how to knit the first ever hat for my daughter (and oh, I also made another one with a different pattern for myself :) (can be found on my knitting post))

But my knitting venture has nothing to do with this post. 
Whenever I met Gerri for my classes she used to bring along this very cute messenger bag to carry her Surface in. While I used my phone to read patterns, it was extremely cumbersome to navigate between multiple pdfs. Therefore, like her, I too wanted to carry along a tablet for my next sessions (instead of a laptop, it was just lighter to carry the tablet around). So I made one :)

Since we eat a lot of rice there are empty rice bags always lying around our home. We usually donate the bags but this time I turned it into my iPad bag's lining and used the zip for the second pocket on the bag. Here are the materials I used:


The pattern is very similar to my other bags in the blog. This one was much easier to work on because I did not have to fuse any interfacing on the back side as the rice bag was thick enough. However, I did fuse some interfacing on the front side because of the second zipper. 

The strap was saved from another bag that was given away; I just couldn't find a better way to recycle it :) 

PS: Like I always mention on all my posts, there are multiple tutorials on Pinterest & Youtube for an iPad/messenger bag, however, I did not follow any for this one.


Saturday, October 15, 2016

Hair Clip Organiser

Usually with girl children, they want to dress up and wear matching accessories :) So when my parents were coming over to visit us I had asked my mom to bring a lot of hair clips. But the thing with having so many accessories is that you just cant locate them when you need.. especially when your kid's late to school! I was having a very difficult time to pick an almost matching hair clip every single day because they were all in the same bowl and all mixed up.


Then I remembered having made a small organiser for my neighbour's daughter in Bangalore. 


So I decided to end the misery by making another organiser for my daughter's clips. I was initially looking to buy it off because I was unable to sew/DIY since I started working. But after seeing so many posts on Pinterest I realised its easier to make than spend $15 on a professionally made one.

One weekend I took my parents to a nearby mall where we went to Michaels to buy some beads.. there we saw very cheap ribbons for just a dollar :) So I bought a couple and sewed them together and included a zillion partitions to hold all her zillion clips. 


I bought the J monogram in Michaels too and the roses were from an old hair band that had snapped. 

Now, this is what it looks like :) 


Monday, July 25, 2016

Tshirt to Pyjama

One of my brother's friends owns a garment factory outlet. The store mainly stocks sports clothing, amongst others, made of bamboo cotton which keeps you cool during summers and warm during winters. Sadly, the store holds clothes only for adults and nothing for kids. 
So last year, before moving here we decided to buy a couple of bamboo cotton clothes to wear at home. The cloth is super soft and my husband fell in love with it right away. 

Over the past year the only full-arm t-shirt he bought had become tight (ahem.. not because the t-shirt shrunk!). However, he was still not done with having it around so I decided to make a pyjama for my daughter - this way the t-shirt would still be in the family :) 

After watching few videos and tutorials on Youtube and Pinterest I ended up with my first pyjamas for my daughter:


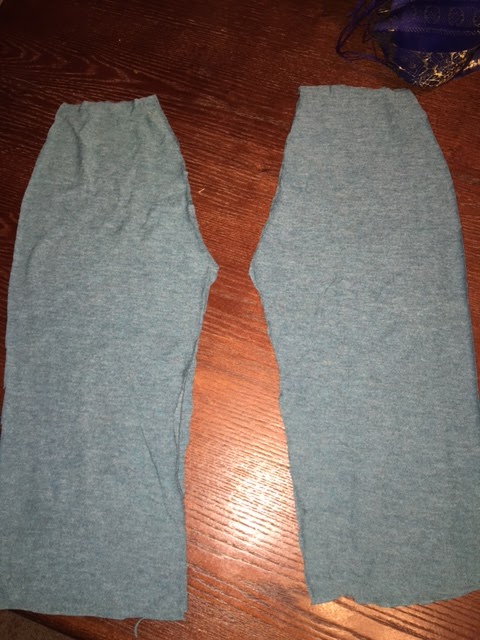
I traced out an existing pyjama pants as pattern and cut 2 pieces of the tshirt. 


I sew up the sides together by inserting one leg piece right-side out into the other leg piece wrong side out and then turned the attached pieces wrong side out.


After that I attached the elastic to the waist area. And I ended up with this:


In the picture, the pant looks like capris because a small portion of the material was stuck in her crotch (which I noticed only after uploading the picture).


Monday, July 4, 2016

Frock from an old shirt

After a few months break, I am back to sewing! The first half of the year was very eventful for our family but now things have started to settle down and we are back to our routines!

Since summer has officially begun in this part of the country, my husband and I got to cleaning our wardrobe last weekend. There were so many clothes he wanted to get rid off/donate. And off the lot, there was this shirt (10 years old that I gifted him for our engagement) and I thought to try and convert it into a frock for my little one. And as usual, I found some great tutorials on pinterest and youtube..

This is what I had:


I traced one of my daughter's old frocks; the picture above shows it vaguely. While cutting it, you want to fold the shirt into half and then cut on one side, this makes both sides even.


I hemmed the bottom, hands and neck. Maybe I should have added a pocket or two but oh well! I might just applique a picture onto it sometime later :)